Mar 17, 2020 10 min read
How to Build a Slack App with Dark
Curtis Blackwell
Manager, Digital Product Delivery

Dark is a new language for writing deployless backends. It’s also the editor and infrastructure. That means you can only write Dark in your browser, but you never need to set up a server. You don’t even deploy to a server, the code is live as you write it, with changes hidden behind feature flags to prevent breaking your apps.
Dark is a holistic programming language, editor, and infrastructure. By putting the three together we prevent developers from needing to think about infrastructure and deployment, and give them the ability to work with real data and traces.
— Engineering Team at Dark
At the time of writing, it’s still in private beta, but you can request an invite.
Want to gain access faster? Mention my name: Curtis Blackwell, Senior Application Developer at Highland.
I also want to point out that the people creating Dark seem awesome. Their values align well with Highland’s, and I personally admire their active approach to inclusivity—I would love to see more tech companies put people first.
Anyway, the app I’ll show you how to build is similar to IRC’s /me
command. Yes, Slack already has a /me
command, but all it does is regurgitate what you type in italics as though you said it yourself.


Instead, we’ll use /act
to have a narrator describe our actions.


To accomplish this, we’ll need to do a few things:
Create the app in Slack
Write an OAuth endpoint in Dark
Write an endpoint for the
/act
slash command to hit, andGrab the user’s profile from Slack’s API
1. Creating the Slack app
First, visit your apps page in your Slack workspace and click Create New App.

Name and choose the workspace for your new app, then click Slash Commands then Create New Command.


Fill out the form using your canvas URL appended with /act for the Request URL, e.g. https://your-username-or-canvas.builtwithdark.com/act
.

We also need to set up an OAuth redirect URL. Under Features, click OAuth & Permissions then, on the next page, click Add New Redirect URL. Enter your canvas URL appended with /oauth-redirect
. Don’t forget to click Add and Save URLs (no auto-save for you [insert Seinfeld soup nazi image]).
This next bit won’t matter until later, but taking care of it now helps us avoid the messiness of having to re-install the app and generate a new OAuth token.
Right underneath the OAuth Tokens & Redirect URLs card, you should see Scopes. Just add the users.profile:read
scope so that we can display the user’s name in the narration later.

A brief intro to trace-driven development
Now that we’re about to venture into the Dark side of things ([insert lame Star Wars pun] no pun intended, loljkjkjk), it’s important that you know at least a little bit about trace-driven development. I won’t pretend to know much about it—and what I’m about to say may be technically wrong—but in the case of Dark, I promise it’s practical.
Here’s Dark’s guide. I recommend you read it, but I’ll include everything you need to know to get through this tutorial.
First, a trace is basically a log of an event. As far as I’ve seen in Dark, it’s specifically a log of a request or function call. Without a trace, the Dark IDE won’t allow you to write code that attempts to access non-existent values, e.g. request.headers
is inaccessible until you actually send a request. (Dark plans to change this, according to their guide.) When you have a trace available, a small dot will appear to the left of the handler, sort of like a tab/window in a more traditional IDE. As you create more traces, you gain the ability to select a specific one to work with. Simply click the dot representing the desired trace.

In this image, the pink arrow points to the currently-hovered trace (its data appears to the left), the blue arrow points to other available traces, and the green arrow points to the currently selected trace (its data appears in tooltips and suggestions as you type).
2. Writing an OAuth endpoint in Dark
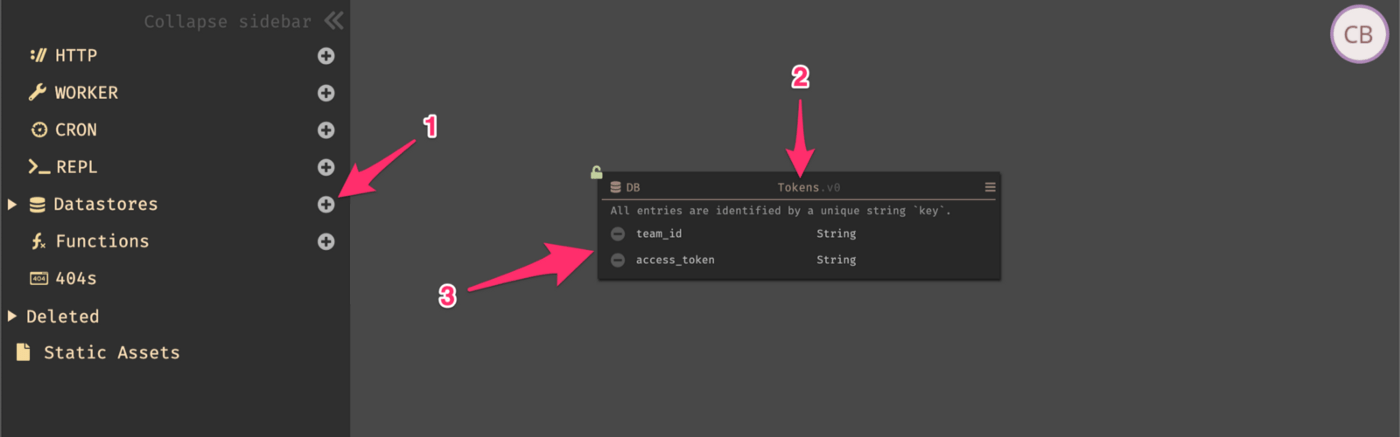
Before we can write our OAuth endpoint, we’ll need to create a datastore to persist authorized Slack teams’ IDs and their OAuth access tokens, allowing members of the Slack workspace to use your app.

Add a datastore by clicking the plus sign next to Datastores
Name the datastore
Tokens
, andAdd
String
fields forteam_id
andaccess_token
Next, we need to send a request to the endpoint before writing it. In the Slack app settings, under Settings, click on Manage Distribution. Copy the Sharable URL, and visit it in your browser.

You should see a message about your Slack app requesting permissions. Allow the app to access your Slack workspace—you should see a 404. In Dark under 404s, you should see the result of this 404.

Click on the plus sign to create an endpoint.

Type the following code into the endpoint.
Note: Even if Dark has added the ability to copy and paste code by the time you read this, I highly recommend typing this out. Doing so introduces you to how the editor works. Some things behave a little differently than I’m used to in editors like VS Code, and it’s nice to understand those differences.No this isn’t actually JavaScript, but the syntax is similar enough that it’s easier to read if we lie to Github like the filthy little animals we are.
Replace your_client_id
and your_client_secret
with those values found under the Basic Information page in your Slack app’s settings.

The code just goes through the 
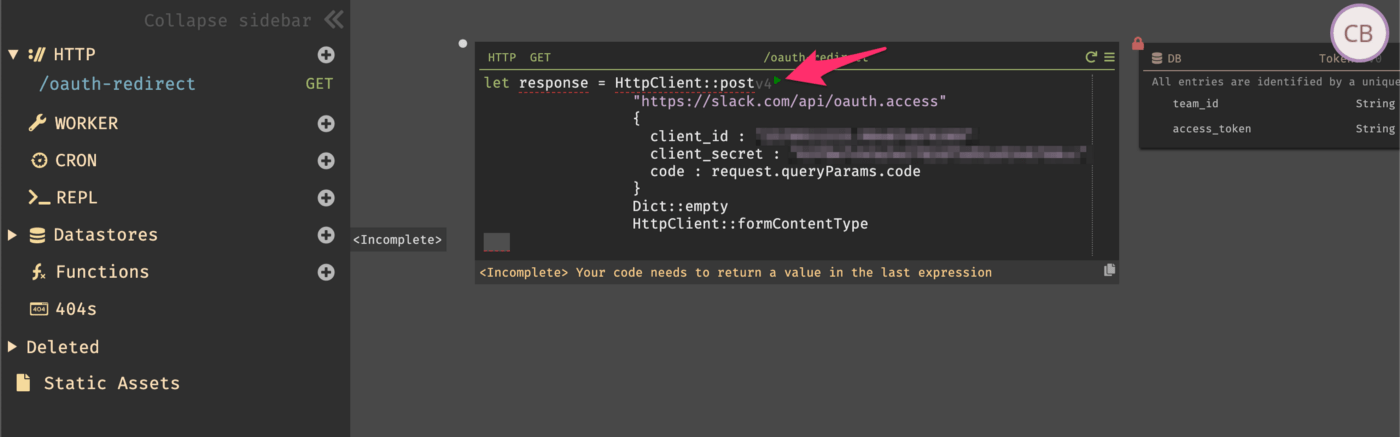
typical authorization code grant flow, so I won’t delve into what’s going on here.
After defining response
, click the play button to have Dark execute the code. You must do this before defining workspace
so Dark allows you to access the values in response
.

If you receive an error indicating that the code has expired, just revisit the Sharable URL and click Allow again. Make sure you select the newest trace by clicking the highest white do to the left of the endpoint.
After defining workspace
, click the play button next to it so Dark persists the OAuth token.
3. Writing the slash command’s endpoint
Finally, we get to the most exciting part: writing a slash command! We already created the command in the Slack app settings earlier; now we just need to send a request to Dark so that we have a trace to work with.

Just enter /act whatever text you want
in Slack. Don’t worry when you get the error message; we expect that until we actually write the code to handle the request Slack sends to Dark.
Go back to your 404s in your Dark canvas and create a new endpoint from the new /act
404.
For now, let’s keep it simple and just throw italicized text back at Slack. After we have that working, we can add the more complex feature of displaying the user’s name. In the new /act
endpoint, add the following code:
This code simply sends a POST request back to Slack using the URL Slack provided in the request, request.body.response_url
. Then we pass the text we want to send (italicizing text is as simple as wrapping the text in underscores, just like when typing messages in Slack) along with the type of response. Without specifying the latter, the message would be visible only to the user who used the slash command. For more info, see Slack’s API docs.
Once you have this done, click the play button in the Dark endpoint to have it respond to Slack again. This time, you should see your text displayed. Huzzah!

4. Grabbing the user’s profile
Now for some more fun, we’ll use Slack’s API to grab the user’s name for some proper narration. Let’s update our /act
endpoint in Dark to look like this:
First, to query the Slack API, we have to snag our access token from the Tokens
datastore using the team_id
from the request. Then we can pass the token and user_id
(also from the request) to Slack’s API and pull the display name out of that.
For more info, see the docs on the API endpoint.
😅 Phew
We now have a working Slack app to narrate our every move 👀! For some finishing touches, you can head over to the Slack app settings’ Basic Information page and fill out the Display Information card.
Slack’s Display Information form showing the values I used to get my desired style.

To get more practice working with Dark, I suggest “refactoring” (no tests 😱) the /act
endpoint to use functions to fetch the Slack user profile and to italicize text.
If there’s interest in a follow-up post, I can share how I did that and added a /narrate
slash command for non-action-oriented narration purposes. I use it in Highland’s #d20-break channel where I DM some light D&D using the Narrator app and D&D Dice Roller
